Tables
Tables | ||
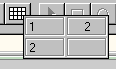
| To create a table, select an insertion point on a page, then click & drag on the table button on the toolbar to select the number of cells you desire. (Or, just click the table button to bring up a dialog to specify rows and columns.) You can put any object within a table, such as another table, graphics, plug-in windows, or form elements. The Inspector has many controls to set table appearance. Select the entire table with the cursor to make the Table tab visible. There are also several buttons on the toolbar for splitting, joining, inserting and deleting cells. | | |
| You may also select a range of cells in Microsoft Excel (R), and then paste that selection into PageMill. When you paste, PageMill will automatically convert the Excel (R) table into HTML format. For large tables, this conversion may take a long time, and require a large amount of RAM. | ||
 Formatting Cell Contents
You format the contents of a cell just as you do any other text in a Web page. To change the text appearance, apply any of the paragraph formats or character styles to a cell. To select the entire contents of a cell, place the insertion point anywhere in the cell, and then select "Select All" from the Edit menu.
For example, to create a row or column heading, select the text and then choose a heading format. You can also change the alignment, color, and relative font size of a cell's contents.
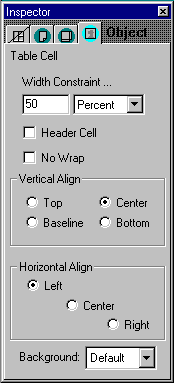
You may also specify a cell's vertical and horizontal alignment in the Inspector after that cell has been selected.
Each cell may have a different color background. To choose a cell's background color, select the cell, or range of cells, and then choose a background color from the pop-up menu at the bottom of the Inspector. Alternatively, you can drag a color from the Color Panel onto the cell background color chooser in the Inspector.
Selecting Cells and Cell Contents
To select cell or ranges of cells, hold down the shift key while dragging across the cells that you want to select. To select the entire contents of a cell, place the insertion point anywhere in the cell, and then select "Select All" (or Ctrl-A) from the Edit menu.
Creating a Nested Table
PageMill allows you to put one table inside another. This is a convenient way to include a table when you're using a borderless table as a design aid.
Changing a Table's Width and Height
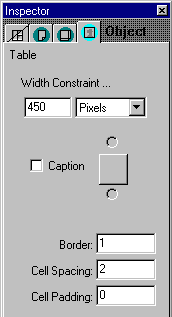
 Tables can be be constrained to specific widths, in terms of either
pixels or percentages. A 100% table, for instance, will always fill the
entire width of the browser in which it is displayed. If, however, you want
your table to always appear at the same absolute with, regardless of the
size of the browser window, your table should be constrained to pixel width.
You can change between pixel and percent width by using the pop-up window
in the Inspector.
Tables can be be constrained to specific widths, in terms of either
pixels or percentages. A 100% table, for instance, will always fill the
entire width of the browser in which it is displayed. If, however, you want
your table to always appear at the same absolute with, regardless of the
size of the browser window, your table should be constrained to pixel width.
You can change between pixel and percent width by using the pop-up window
in the Inspector.
The width and height of a table can be adjusted by dragging the handles on the outline of a selected table, or by changing the table specifications in the Inspector.
Deleting the table width specifications in the Inspector will result in the table's width being determined by the width and contents of columns in the table.
Changing a Cell's Width and Height
 Row heights and column widths can be changed by simply dragging the
column and row borders.
Row heights and column widths can be changed by simply dragging the
column and row borders.
Alternatively, to change a cell's width, select the cell, and then enter the cell's intended width in the appropriate space in the Inspector. A pop-up menu will allow to choose the sizing in terms of absolute pixels or as a percentage of table width.
Changing the Cell Spacing
Cell spacing refers to the amount of space between the cells, that is, the width of the shaded lines that separate the cells. Changing the cell spacing effects all the cell dividers. You don't use this setting to add a border to a table, however; a border is added outside edge of a table.
Changing the Cell Padding
Cell padding refers to the amount of space between the edges of the cells and the cell's contents. Changing the cell padding effects all the cells. The default cell padding is one pixel.
Changing the Table Border
A border is an effective way to help a table stand out from the page background and from the other objects on a Web page. By default, a table has a border of one. You cannot change the border color.
If you are using a table for page layout, and the table's border is set at zero, a thin, dotted line will still appear around the table's borders in Edit mode. This feature will help you see the table layout while you are editing. The borderless table will, however, appear correctly in Preview mode.
Adding a Caption
You can choose to include a caption for your table. The caption tells your reader what the table is about. By default, the caption in placed above the table but you can place it under the table.
Adding and Deleting Rows and Columns
![]() You can add and delete rows and columns to and from existing tables.
Simply select a cell or range of cells, and then choose from one of the
available table buttons.
You can add and delete rows and columns to and from existing tables.
Simply select a cell or range of cells, and then choose from one of the
available table buttons.
Alternatively, to add rows or columns, you can just hold the option key and drag an outside row or column border.
Joining (Merging) Cells
![]() You can merge adjacent cells by selecting a range of adjacent cells,
and then choosing the merge button.
You can merge adjacent cells by selecting a range of adjacent cells,
and then choosing the merge button.
Splitting Cells
![]() You can split cells that have been previously merged by selecting the
merged are, and then choosing the appropriate buttons to split the cell,
either vertically or horizontally.
You can split cells that have been previously merged by selecting the
merged are, and then choosing the appropriate buttons to split the cell,
either vertically or horizontally.